Partitioning and wildcards in an Azure Data Factory pipeline

In a previous post I created an Azure Data Factory pipeline to copy files from an on-premise system to blob storage. This was a simple copy from one folder to another one.

It’s possible to add a time aspect to this pipeline. Let’s say I want to keep an archive of these files. In my source folder files get added, modified and deleted. I’d like to create daily snapshots of this folder.

To enable this scenario you only need to change the dataset that represents the file location in blob storage.

{
    "name": "AzureBlobDatasetTemplate",
    "properties": {
        "location": {
            "type": "AzureBlobLocation",
            "folderPath": "myblobcontainer/{Year}/{Month}/{Day}",
            "partitionedBy": [
                {
                    "name": "Year",
                    "value": {
                        "type": "DateTime",
                        "date": "SliceStart",
                        "format": "yyyy"
                    }
                },
                {
                    "name": "Month",
                    "value": {
                        "type": "DateTime",
                        "date": "SliceStart",
                        "format": "MM"
                    }
                },
                {
                    "name": "Day",
                    "value": {
                        "type": "DateTime",
                        "date": "SliceStart",
                        "format": "dd"
                    }
                }
            ],
            "linkedServiceName": "StorageLinkedService"
        },
        "availability": {
            "frequency": "Day",
            "interval": 1
        }
    }
}

I’ve changed the folderPath and added a partitionedBy element. The folderPath now contains placeholders, the elements between curly braces. The definition of these placeholders is defined in the partitionedBy array. Each element will use the variable SliceStart to create a value. The only other variable you can use, at this time, is SliceEnd. If you make this change to the dataset the next run of the pipeline will produce the desired output.

partitionedfiles


I also tested what happens when a file is in use, an exception. So make sure the application that creates the files you want to copy releases any locks.

inuse


Wildcards can be used in the filename and the filter, so you can copy all txt files in a folder with *.txt. Unfortunately wildcards and partition placeholders can not be combined. So if your files are all being stored in one folder, but each file has the time in its filename (myFile-2015-07-01.txt), you can’t create a filter with the dynamic partitions (myFile-{Year}-{Month}-{Day}txt). It’s only possible to use the partitionedBy section in the folder structure as shown above. If you think this is a nice feature, go vote here!

The price of the current setup is determined by a couple of things. First we have a low frequency activity, that’s an activity that runs daily or less. The first 5 are free, so we have 25 activities remaining. The pricing of an activity is determined on the place where it occurs, on-premise or in the cloud. I’m assuming here it’s an on-premise activity since the files are not located in Azure. I’ve asked around if this assumption is correct but don’t have a response yet. The pricing of an on-premise activity is €0.5586 per activity. So that would mean almost €14 for this daily snapshot each month. If we modified everything to run hourly we’d have to pay €554,80 per month. You can find more info on the pricing on their website.

In this scenario I’ve demonstrated how to get started with Azure Data Factory. The real power however lies in the transformation steps which you can add. Instead of doing a simple copy the data can be read, combined and stored in many different forms. A topic for a future post.

Upside:

  • Rich editor
  • Fairly easy to get started
  • No custom application to write
  • On-premise support via the Data Management Gateway
  • No firewall settings need to be changed

Downside

  • Can get quite expensive

Copying files with Azure Data Factory

The goal of Azure Data Factory is to create a pipeline which gathers a lot of data sources and produces a reliable source of information which can be used by other applications. The pain of interfacing with every differnt type of datastore is abstracted away from every consuming application. You can have relational databases, flat files, whatever and create a pipeline which transforms and enriches the data.  In an update published the end of March it was announced that you can also copy files. I wanted to try this out and it proved to be a bit more cumbersome than I first imagined. Let’s take a look.

filecopyflowI want to create a very basic flow. Let’s say I have an application which is populating files in a folder and I now want to move the file into Azure blob storage. I can use the same use case as mentioned in my previous post, I’m placing data leaks in a folder and need them to be sent online for further processing.

After creating a data factory in your Azure account we’ll need the following components:

  • Two linked services
    • A connection to my on-premises folder
    • A connection to my blob storage account
  • Two datasets (also called tables)
    • A dataset containing info on where my data is stored on premise and how many times per day it can be fetched.
    • A dataset which has info on how and where to store the data in blob storage
  • One pipeline which contains an activity which connects the datasets.

The connection to the on premise file is handled by an application which you need to install on-premise.  By navigating to the linked services slice you can add a data gateway.

datagateway

To configure a gateway you only need to provide a name, you can then download the data gateway application and install it on premise. After installing the application you need to enter the key which can be viewed in the Azure portal.

newdatagateway

As far as the on-premise configuration, you are done. You do not need to configure any firewall ports but you can only install it once on a PC.

So far the wizards. Now we need to create the pipeline. After clicking on the “Author and deploy” tile. The browser navigates to an online editor.

authoranddeploy

You create linked services, datasets and pipelines by using JSON. When clicking on any of the menu options, you can select a template to get started.

editornew


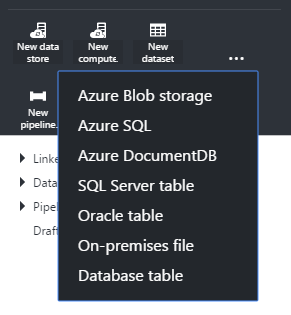
As mentioned earlier I needed two linked services. You can create those via the new data store option. The first one I’ll create is the on-premise file data store.

{
    "name": "OnPremisesFileSystemLinkedService",
    "properties": {
        "host": "localhost",
        "gatewayName": "mydatagateway",
        "userId": "BennyM",
        "password": "**********",
        "type": "OnPremisesFileSystemLinkedService"
    }
}

The options you need to configure are:

  • host, which will be the name of the machine which contains the files/folder you need to connect to
  • gatewayName, which has to match the name of the gateway which we created earlier
  • a userid and password or encryptedcredentials to use to connect from the gateway to the target machine
  • type, which needs to be OnPremisesFileSystemLinkedService
  • name, which we will use later

The next one will be the connection to the Azure storage. You can get the template by clicking “New data store” and selecting “Azure storage”.

{
    "name": "StorageLinkedService",
    "properties": {
        "connectionString": "DefaultEndpointsProtocol=https;AccountName=bennymdatafactory;AccountKey=**********",
        "type": "AzureStorageLinkedService"
    }
}

The options you need to configure are:

  • name, which we will use later
  • connectionstring, which needs to match your connectionstring for Azure storage
  • type, which needs to be AzureStorageLinkedService

Next one, the first dataset: on-premises file.

{
    "name": "OnPremisesFile",
    "properties": {
        "location": {
            "type": "OnPremisesFileSystemLocation",
            "folderPath": "c:\\Temp",
            "linkedServiceName": "OnPremisesFileSystemLinkedService"
        },
        "availability": {
            "frequency": "Day",
            "interval": 1,
            "waitOnExternal": {
                "dataDelay": "00:10:00",
                "retryInterval": "00:01:00",
                "retryTimeout": "00:10:00",
                "maximumRetry": 3
            }
        }
    }
}

The options you need to configure:

  • again a name, which we’ll use later
  • type, which has to be OnPremisesFileSystemLocation
  • folderpath, where is the folder I want to sync. Note the double slashes.
  • linkedServiceName, this has to be the same value which we used earlier when we created the data store for the on-premises gateway.
  • availability, how many times will the on-premises file or folder by synchronized. What’s very important is the waitOnExternal. You have to configure this if the data is not produced by the data factory itself. In this case it’s an external source so I have to fill in some values.

Our next dataset is the Azure blob.

{
    "name": "AzureBlobDatasetTemplate",
    "properties": {
        "location": {
            "type": "AzureBlobLocation",
            "folderPath": "myblobcontainer",
            "linkedServiceName": "StorageLinkedService"
        },
        "availability": {
            "frequency": "Day",
            "interval": 1
        }
    }
}

Fairly easy to configure.

  • again a name
  • the type which has to be AzureBlobLocation
  • the folderPath wich will be the path inside my Azure blob storage account which was configured in the linked service
  • linkedServiceName, which has to match the name we used earlier.

Then the actual workflow, the pipeline.

{
    "name": "CopyFileToBlobPipeline",
    "properties": {
        "activities": [
            {
                "type": "CopyActivity",
                "transformation": {
                    "source": {
                        "type": "FileSystemSource"
                    },
                    "sink": {
                        "type": "BlobSink",
                        "writeBatchSize": 0,
                        "writeBatchTimeout": "00:00:00"
                    }
                },
                "inputs": [
                    {
                        "name": "OnPremisesFile"
                    }
                ],
                "outputs": [
                    {
                        "name": "AzureBlobDatasetTemplate"
                    }
                ],
                "policy": {
                    "timeout": "00:05:00",
                    "concurrency": 4
                },
                "name": "Ingress"
            }
        ],
        "start": "2015-06-28T00:00:00Z",
        "end": "2015-06-30T00:00:00Z"
    }
}

I will not go over every property. What’s important is that in the copy activity we tie our two datasets together. The start and end times indicate the time period our pipeline will be active. This is very important as I’ve not found any way you can pause a running pipeline. If for instance I indicated earlier that I want my folder to be copied every 15 minutes and indicate a start date in the pipline in the year 2010, the pipeline will do all historical runs! So be careful when you configure this as Azure Data Factory isn’t the cheapest service around.

Every time you create a linked service, dataset or pipeline you click deploy.  The editor will then validate if all the names you mention are actually correct. The editor is quite good, as it even detects errors in datatypes and gives you help and intellisense (control + space).

editorerror

editorhelp

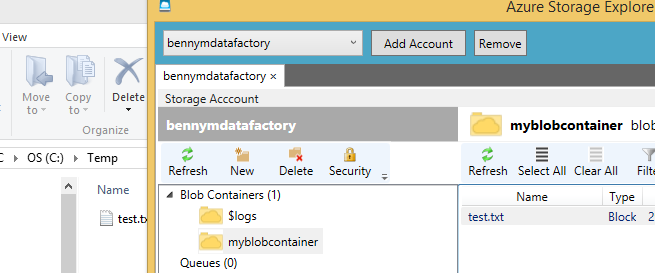
And with all this deployed, the folder is being synchronized online.

copyresult

This is probably one of the most expensive file copy samples. In a next post I’ll investigate more features. One of the drawbacks of the current setup is that every time the sync runs all files are overwritten. All files are copied all the time as is.

Sources:


Using HDInsight & Storm to process 100 million events

bqezxjIn my last post I threw 100 randomly generated email addresses to an Azure event hub and it didn’t even budge. Now it’s time to process the data and store it in a setup that resembles haveibeenpwned.

With the events now in the event hub, I could create another cloud service which uses the .NET SDK to read the data. There are two ways to implement this, either with the EventHubReceiver class or with the EventProcessorHost. I’ll try these out in future post.

For now I wanted to use something else, HDInsight & Storm. HDInsight is Hadoop as PaaS. Storm is a computation system to process streams of data and, as advertised on their website, should be able to process millions of tuples per second. Sounds like a good way to handle the 100 million e-mail addresses I have waiting.

In order to use Storm you need to understand only a few concepts:

  • Tuple: a piece of information that needs to be processed.
  • Spout: reads from a stream and returns tuples
  • Bolt: processes tuples and can forward or produce new tuples
  • Topology: links spouts and bolts together

This is a very rudimentary explanation, but should be enough for this post.

In order to write and publish a topology in Visual Studio, you should have the Azure SDK and the HDInsight tools for Visual Studio. Let’s look at the different components we need.

The spout will be reading from our event hub. Microsoft has already written a spout which you can use. However it is written in Java. Storm is not bound to one language, a core feature and with HDInsight you can have hybrid topologies. Any work you have already invested in Storm can be reused. Java and C# spouts and bolts can even work together. Let’s look at the configuration that we need to get our spout up and running.

TopologyBuilder topologyBuilder = new TopologyBuilder("EmailProcessingTopology");           
 
int partitionCount = Properties.Settings.Default.EventHubPartitionCount;
 
JavaComponentConstructor constructor = JavaComponentConstructor.CreateFromClojureExpr(
    String.Format(@"(com.microsoft.eventhubs.spout.EventHubSpout. (com.microsoft.eventhubs.spout.EventHubSpoutConfig. " +
        @"""{0}"" ""{1}"" ""{2}"" ""{3}"" {4} ""{5}""))",
        Properties.Settings.Default.EventHubPolicyName,
        Properties.Settings.Default.EventHubPolicyKey,
        Properties.Settings.Default.EventHubNamespace,
        Properties.Settings.Default.EventHubName,
        partitionCount,
        "")); 
 
topologyBuilder.SetJavaSpout(
    "EventHubSpout",  
    constructor,      
    partitionCount);

This code can be found in the samples of the HDInsight team and is pretty straightforward. Create an eventhubspout and add it to the topology. The partitionCount indicates how many executors and tasks there should be and it’s suggested that this should match the amount of partitions of your event hub.

It gets more interesting in the first bolt. A bolt is a class that implements ISCPBolt. This interface has one method, Execute, which receives a tuple.

public void Execute(SCPTuple tuple)
{  
    string emailAddress = (string)tuple.GetValue(0);
 
    if (!string.IsNullOrWhiteSpace(emailAddress))
    {             
        JObject eventData = JObject.Parse(emailAddress);
        try
        {
            var address = new System.Net.Mail.MailAddress((string)eventData["address"]);
            var leakedIn = (string)eventData["leak"];
            var breachedAccount = new BreachedAccount(address, leakedIn);
            var retrieveOperation = TableOperation.Retrieve(breachedAccount.PartitionKey, breachedAccount.RowKey);
            var retrievedResult = table.Execute(retrieveOperation);
            var existingAccount = (Device)retrievedResult.Result;
            if(existingAccount == null)
            {
                TableOperation insertOperation = TableOperation.Insert(new BreachedAccount(address, leakedIn));
                table.Execute(insertOperation);
                ctx.Emit(Constants.DEFAULT_STREAM_ID,new[]{tuple}, new Values { address.Address });
            }
            else
            {
                existingAccount.BreachedIn += breachedAccount.BreachedIn;
                TableOperation insertOperation = TableOperation.Replace(existingAccount);
                table.Execute(insertOperation);
            }                    
            this.ctx.Ack(tuple);
        }
        catch (Exception ex)
        {
            Context.Logger.Error(eventData.ToString());
            Context.Logger.Error(ex.Message);
            this.ctx.Fail(tuple);
        }
    }
    else
    {
        Context.Logger.Info("empty address");
        this.ctx.Ack(tuple);
    }
}

The tuple is the JSON object which was send to the Azure event hub in my previous post. It contains the email address and the website which was breached. Table storage is queried to see if the email address is already present, if this is the case the entry is updated otherwise the new account is added to the system. Only new accounts are emitted for further processing.

The second bolt in the system will insert new accounts into a SQL database. Its execute method is quite different.

public void Execute(SCPTuple tuple)
{           
    // Check if the tuple is of type Tick Tuple
    if (IsTickTuple(tuple))
    {               
        if((DateTime.UtcNow - lastRun) >= TimeSpan.FromSeconds(batchIntervalInSec))
        {
            Context.Logger.Info("Time to purge!");
            FinishBatch();
        }                                
    }
    else
    {                
        breachedAccounts.Add(tuple);                
        if (breachedAccounts.Count >= batchSize)
        {
            Context.Logger.Info("Max reached, time to purge!");
            FinishBatch();
        }
        else
        {
            Context.Logger.Info("Not yet time to purge!");
        }
    }
}

This bolt does not process every tuple it receives immediately. Instead it keeps a list of tuples ready for processing when either a maximum count is reached or a specific amount of time has passed since the last purge. In the FinishBatch method a SqlBulk copy is performed to insert records in a SQL database.

private void FinishBatch()
{
    lastRun = DateTime.UtcNow;
    DataTable table = new DataTable();
    table.Columns.Add("Email");
    if (breachedAccounts.Any())
    {
        foreach (var emailAddress in breachedAccounts)
        {
            var row = table.NewRow();
            row["Email"] = emailAddress.GetString(0);
            table.Rows.Add(row);
        }
        try
        {
            using (SqlBulkCopy bulkCopy = new SqlBulkCopy(connection))
            {
                bulkCopy.DestinationTableName = "Emails";
                bulkCopy.ColumnMappings.Add("Email", "Email");
                bulkCopy.WriteToServer(table);
            }
            foreach (var emailAddress in breachedAccounts)
            {
                ctx.Ack(emailAddress);
            }
 
        }
        catch (Exception ex)
        {
            foreach (var emailAddress in breachedAccounts)
            {
                ctx.Fail(emailAddress);
            }
            Context.Logger.Error(ex.Message);
        }
        finally
        {
            breachedAccounts.Clear();
        }
    }
}

Both the table storage bolt and the SQL bulk copy bolt have lines with ctx.Ack, Fail or Emit. These are places where you can indicate whether processing of a tuple has succeeded, failed or you are emitting a new tuple to be processed further downstream. It also enables to replay tuples. If the SQL bulk copy fails the tuple will be processed again at a later time. The azure table spout expects your bolts to ack.

topologyBuilder.SetBolt(
    "TableStorageBolt",                                            
    TableStorageBolt.Get,
    new Dictionary<string, List>{
        {Constants.DEFAULT_STREAM_ID, new List(){"address"}}
    },
    256,                                      
    true)
.DeclareCustomizedJavaSerializer(javaSerializerInfo)
.shuffleGrouping("EventHubSpout");
 
topologyBuilder.SetBolt(
    "SQLBolt",                                              
    SQLStorageBolt.Get,
     new Dictionary<string, List>(),
    2,                                     
    true)
.shuffleGrouping("TableStorageBolt", Constants.DEFAULT_STREAM_ID)
.addConfigurations(new Dictionary<string,string>{{"topology.tick.tuple.freq.secs","1"}});
 
topologyBuilder.SetTopologyConfig(new Dictionary<string, string> { 
    {"topology.workers", partitionCount.ToString()}
});

The two bolts also need to be added to the topology. The tableStorageBolt is configured with a name, a method which can be used to create instances and a description of its output. In this case I’m emitting the email address to the default stream. The parallelism hint is also configured and the boolean flag which indicates this bolt supports acking. Since this bolt sits behind the Java spout, we also need to configure how the data of the spout can be deserialized. The bolt is also configured to use shuffleGrouping, meaning that the load will be spread evenly among all instances.

The SQLBolt is configured accordingly, with the additional configuration to support time ticks.

After I created an HDInsight Storm cluster on Azure I was able to publish the topology from within Visual Studio. The cluster itself was created in 15 minutes.

Capturepublish

It took quite some time to find the right parallelism for this topology but with the code I’ve posted I got these results after one hour:

Capturebolts

Table storage is slow, the 2 SQL bolts are able to keep up with the 256 table storage bolts. After one hour my topology was able to process only 10 million records. Even though I was able to send all 100 million events to the event hub in under two hours, processing would take 5 times longer.

One of the causes for this is the test data. The partition and row key for the table storage is based on the email address.

class BreachedAccount : TableEntity
{
    public BreachedAccount() { }
 
    public BreachedAccount(System.Net.Mail.MailAddress emailAddress, string leakedIn)
    {         
        this.PartitionKey = emailAddress.Host;         
        this.RowKey = emailAddress.Address;            
    }
 
    public string BreachedIn { get; set; }
}

Yet none of the email addresses in my test data share the same partition key. If the data was more realistic I would be able to use batches. In the original Adobe data breach 115 million addresses were part of 130 different domains. Table storage allows you to send batches of 100 records to the same partition key, which should result in less processing time. I’ll regenerate the test data with the same characteristics, modify the table storage bolt and rerun the experiment at a later time, hoping to get a better result.

The original standard instance of SQL Server was scaled to an S3, which allowed me to stay just below the max throughput with batches of 1000 records.

Capturesql

At the moment I actually have the same performance as Troy’s setup but with quite a different approach. Storm and HDInsight were new to me and I enjoyed the programming model. The scale and possibilities it can give are enormous, yet every part of your topology needs quite some attention if you want to have a high throughput solution.

The .NET part of the SDK is not yet entirely complete, so you can’t just port Java snippets to C# and expect them to work. I also ran into some NotImplementedExceptions. Microsoft is still busy implementing the SDK and the team is actively adding examples and functionality.

Further reading:

Event Hubs Programming Guide
Storm Applied
Introduction to Apache Storm on HDInsight: Real-time analytics for Hadoop
HDInsight Storm Examples
Process events from Azure Event Hubs with Storm on HDInsight
Performance Tuning for HDInsight Storm and Microsoft Azure EventHub
Understanding the Parallelism of a Storm Topology

 

Data leak processing

On the excellent blog of Troy Hunt you can read how he’s using Azure webjobs to process leaked user account dumps. As with anything in IT, there are many solutions to a problem. Lately I’ve been busy with Azure event hubs, streaming analytics and HDInsight, I thought it would be a nice experiment to use the same data dump but process it in an entirely different manner. In this first post, I’ll illustrate the data input part. In a follow-up post, I’ll use HDInsight to process the actual data.

The data source that has to be processed is a 5,12 GB text file containing 100 million email addresses which I uploaded to blob storage. Just like Troy I then created a batching solution to process the file in chuncks. I didn’t want to use webjobs so instead I created a cloud service. This service reads line numbers from a queue. The line numbers indicate which lines to read from the text file and send to the event hub.

DataInArchitecture

The code in the cloud service is pretty straightforward. Open a filereader and move to the line number which is indicated in the incoming message from queue storage. Then start reading the lines of the file that need to be processed and fire away at the event hub. I have not given the code much thought, so there are probably several ways this can be improved, I just wanted to get up and running. The event hub receives json objects containing the name of the website and the email address.

using (var streamReader = new StreamReader(file.OpenRead()))
{
    int row = 0;
    while (row < beginAt)
    {
        streamReader.ReadLine();
        row++;
    }
    while (row <= endAt)
    {
         row++;        
         var line = streamReader.ReadLine();        
         lines.Add(line);     
    } 
    Parallel.ForEach(lines, line => {
         var leakedEmail = JsonConvert.SerializeObject(new { leak = "websitesource", address = line });
         eventHubClient.Send(new EventData(Encoding.UTF8.GetBytes(leakedEmail)));
    });
}

I created batches of 1 million rows which means 100 batches that had to be processed. I deployed the service and then observed the system. After seeing one instance running correctly I scaled up the system to get 20 instances running simultaneous.

Capture03

The result was already quite nice. All of the instances together were sending around 4,2 million leaked email addresses every 5 minutes with a peak of 4.5 million at the end.

Capture01


This meant that in under two hours the entire file had been sent into my event hub. Capture06

Between 12 and 1 PM I only had one instance running. I scaled up somewhere between 1 and 2 PM.

What did this cost?

  • Running 20 A1 instances of a cloud service: ~ €3,5
  • Receiving 100 million event hub request (and doing some processing): ~ €2

In the next post I’ll show you the HDInsight part which will take every event from the event hub and insert or update the address in table storage.


ISXperience May 2015 – Machine Learning Presentation

On the last ISXperience I introduced attendees to machine learning and AzureML in general. The talk was largely based on the one I gave on the Azure Bootcamp. The biggest change was the demo on the movie recommendations, which was now fully integrated. I also updated the slide deck so it contained the latest info.

You can download the slides here. If you’re interested and want to learn more, check out the free e-book MVA has provided.


Flemish media HTTPS bankruptcy

Note: I usually blog in something that resembles English, this post however will be in Dutch, in an effort to make the Flemish corner of the internet a little safer.

Voor wie het nog niet wist, ik werk in de IT-sector. Af en toe geef ik een presentatie, zowel voor professionals als voor leken. Eén van de onderwerpen die ik wel eens behandel, is beveiliging. Hierbij hoef ik niet te werken met een fictieve casus, want er zijn jammer genoeg voldoende voorbeelden voorhanden. In het verleden heb ik bijvoorbeeld al verschillende keren Canvas gewezen op hun onveilige inlogpagina. Eerst wat context.

Web 101

Het web is gebouwd rond het HTTP protocol. Het komt erop neer dat er een hoop tekst heen en weer wordt gestuurd. Navigeer je naar een website met je browser dan wordt er een “GET” verzoek naar een bepaalde url gestuurd. Wanneer je een formulier invult op een website, doet je browser normaal gezien een “POST” verzoek. Ik kan bijvoorbeeld surfen naar de website “tweakers.net”. Wat er achter de schermen allemaal gebeurt, kan je zien door in je browser een keer op de toets “F12” te drukken. Wat er dan tevoorschijn komt is de “developer console”, die wordt gebruikt door ontwikkelaars wanneer ze een website bouwen of een probleem moeten oplossen. Je kan deze ook zelf gebruiken om te leren hoe het allemaal werkt. In de screenshot zie je onderaan de technische informatie. Het eerste verzoek dat mijn browser doet is een GET verzoek naar de url tweakers.net.

01tweakers

De computer waar de website op draait, krijgt dit verzoek binnen en zal een hoop tekst terugsturen. Je browser zal dit dan interpreteren en je krijgt een website te zien. Al deze tekst wordt op een leesbare manier doorgestuurd, wat op zich geen probleem is. Soms is er echter informatie die je niet zomaar als leesbare tekst wilt versturen, bijvoorbeeld wanneer je een wachtwoord of kredietkaartnummer moet invullen.

Ook dit kunnen we nakijken op de website. Wanneer je op inloggen klikt, word je doorgestuurd naar een andere pagina. In de adresbalk kunnen we zien dat we niet meer HTTP gebruiken, maar HTTPS.

02tweakers

De ontwikkelaars van de website hebben ervoor gekozen om HTTPS te gebruiken. De S staat voor secure en zolang dat er bijstaat, worden de door jou ingevulde en verstuurde gegevens versleuteld. Ook de gegevens die de website naar jou stuurt, worden geëncrypteerd. Andere personen kunnen dus niet meer meekijken.

03tweakers

Ligt al je internetverkeer dan zomaar op straat? Eigenlijk wel, maar wanneer je thuis op je eigen netwerk zit, is de kans klein dat er mensen meekijken. Ben je echter in een restaurant, station of op een andere publieke plaats waar er gratis WiFi wordt aangeboden, dan bevind je je eigenlijk wel in een potentiële jungle. Met een tool zoals Wireshark kan je al het netwerkverkeer, bedraad en draadloos, inkijken. Als het iets mag kosten, dan kan je ook een WiFi Pineapple kopen waarmee een man-in-the-middle-aanval kinderspel is, zeker in deze tijd van smartphones. Genoeg theorie, laten we een keer kijken naar enkele Vlaamse media websites.

Knack

Op de Knack site staat bovenaan een “Aanmelden” link. Wanneer je verder klikt, krijg je een popup die je inloggegevens vraagt. Op het eerste zicht werkt het niet over HTTPS, we moeten naar de ontwikkelaarstools van de browser gaan om dit te achterhalen. Daar zien we gelukkig dat de inhoud van deze popup wel via HTTPS wordt geladen.

04knack

Bij het invullen van een gebruikersnaam en wachtwoord wordt ook alles netjes via HTTPS verstuurd. Het wachtwoord wordt zelfs niet gewoon als tekst verstuurd. Interessant

05knack


07knack

De computers van Knack ontvangen een MD5 hash van mijn wachtwoord. Je kan in de Javascript die de website gebruikt, opzoeken wat er precies gebeurt. Met deze gegevens kan ik veronderstellen dat mijn wachtwoord op deze manier wordt opgeslagen, wat ook weer een risico met zich meebrengt, maar dat is niet de focus van deze blogpost.

06knack

Vier

Ook op de website van Vier kan ik me aanmelden. Wanneer je op de profielpagina klikt, verschijnt er een extra stukje op de pagina. Dit stond al verborgen op de pagina toen ik er naartoe ben gesurft. Een man-in-the-middle-aanval is dus mogelijk.

08vier

Na het invullen van een willekeurige gebruikersnaam (test@test.be) en wachtwoord (test), ben ik tot mijn verbazing niet alleen ingelogd, maar mijn gebruikersnaam en wachtwoord worden onversleuteld doorgestuurd. Iedereen kan dus mijn gegevens zien. Waarschijnlijk is dit een testaccount die men bij Vier gebruikt. Je kan je dus ook vragen stellen over de verplichte wachtwoordcomplexiteit, maar ook hier ga ik niet dieper op in in deze blogpost.

09vier

Vijf

Op de site van Vijf kan je lezen dat je kan inloggen met accounts van Vier. Dus ook op deze site ben ik met mijn willekeurige testaccount ingelogd en ook hier wordt mijn wachtwoord onversleuteld verstuurd.

10vijf

Vlaamse media websites

Voor andere sites heb ik dezelfde methode gehanteerd en de resultaten staan in de tabel hieronder. Ik heb de volgende puntencriteria gebruikt:

  • Wordt de inlogpagina versleuteld opgevraagd: 2,5 punten
  • Wordt de inlogpagina versleuteld verstuurd: 5 punten
  • Het certificaat dat wordt gebruikt om alles te beveiligen is gecontroleerd via de website SSLLabs. Indien zij een A geven, krijgt de website 2,5 punten. Een A- wordt 2 enzovoort.
Laden Versturen Certificaat Totaal
Knack 2,5 5 2,5 10
Vier 0 0 0 0
Vijf 0 0 0 0
VTM 2,5 5 2 9,5
GVA 0 0 0 0
Beleggerscompetitie 0 0 0 0
Canvas 0 0 0 0
Radio1 0 0 0 0
MNM 0 0 0 0
Belang van Limburg 0 0 0 0
Nieuwsblad 0 0 0 0
De Standaard 0 0 0 0
De Morgen 2,5 5 1,5 9

De resultaten van SSLLabs kan je hier vinden voor Knack, VTM en De Morgen

Conclusie

Dat er een slechte leerling in de klas zou zitten, had ik wel verwacht. Dat de situatie echter zo slecht is, is voer tot nadenken. Deze websites kiezen er momenteel voor om de zwakste schakel te zijn. Mensen hergebruiken wachtwoorden en elke keer je een verbinding maakt met één van deze websites bestaat er dus de kans dat iemand je wachtwoord kan zien. Het is net hetzelfde als je pincode invullen terwijl de bankautomaat op een scherm wordt geprojecteerd.

Zoals ik al heb vermeld, heb ik al enkele keren Canvas op de hoogte gebracht van het probleem. Ik kreeg toen te horen dat het te moeilijk was. Als dat daadwerkelijk zo is, kunnen ze beter hun hele inlogpagina wegnemen of een alternatief zoeken. Zo gebruikt VTM een derde partij en kan je bij Newsmonkey enkel inloggen via sociale netwerksites. Dan hoef je niet een zoveelste gebruikersnaam wachtwoord combinatie te maken.

Knack komt als beste uit de vergelijking, maar de beleggerscompetitie die zij organiseren is wel gebuisd.

Toekomst

Hopelijk veranderen de bovenvermelde websites binnenkort en kan ik hier neerschrijven dat de wereld weer een beetje veiliger is. Denk ook twee keer na voordat je gevoelige informatie invult, controleer dat je over HTTPS werkt en verbind niet met elk WiFi netwerk dat je tegenkomt.

#httpscrusade

Global Azure Bootcamp 2015 – Belgium

Last Saturday I organized, together with my employer Info Support and the Azure user group Azug, the Belgian location for the Global Azure Bootcamp. Across the entire globe 183 locations were doing the same thing, getting people together to learn and hack away on Microsoft’s cloud platform. We organised sessions and provided room so everyone could join in the labs that had been created.

The first session was presented by Johnny Hooyberghs. He gave an introduction on Visual Studio Online with a focus on getting builds set up. His session covered both the hosted build environment and creating a custom VM with your own build server. He also showed how you could add custom build steps to extend the process.

The second session was presented by Tim Mahy. He dived into Azure Search as a Service. He used his own experiences to fuel his talk, an approach I always like. He also explained everything that works underneath the public API of Azure Search which showed that it’s built on proven technology.

Session Setup

This third session was presented by myself. I’ve been experimenting with Azure Machine Learning for some time now and wanted to share what I’ve learned so far. I introduced the basic concepts of machine learning and how they relate to concepts in AzureML. I created one experiment to predict the income level of somebody, based on sample labs you can find in AzureML. For the second half of my talk I had created an online movie database (how original). I used the API of The Movie Database to get some realistic data. I then created an experiment in AzureML to get suggestions for these movies. I closed with some info on what I’ve been working on in my spare time.

The fourth session was presented by Hans Peeters and Glenn Dierckx. They had created an enormous demo around everything App service related. They started off with an API service and eventually created a Web App, a mobile app and closed by creating a logic app which combined everything they had done so far.

Last Session

The final session was presented by Reinhart De Lille. Not a deep dive in technology this time, his talk showed the other side of the coin: “How to get your company from on-premise to a cloud first world”. Quite a way to end the day, as many of the attendees probably don’t dwell on this much.

I’ve gathered the slides here.

People could also deploy compute instances to aid in breast cancer research. At the end of the day 117 billion data points were analysed and little Belgium was on the in the top 10 of contributing countries!

ScienceLab Top 10


Looking forward to next year!

WCF HTTPS And Request Entity Too Large

While working on a project yesterday I ran into a typical WCF error scenario. The requests that were being sent to the service were larger than the defaults allow. This results in a 413 error with the text ‘Request Entity Too Large’ The default of 64kb is there to prevent DoS attacks. If you want to increase the allowed request size you need to modify the binding configuration. You can find many topics on this on the internet. Below you can find a sample:

<system.serviceModel>
  <bindings>
    <basicHttpBinding>
      <binding maxReceivedMessageSize="5242880">
        <readerQuotas ... />
      </binding>
    </basicHttpBinding>
  </bindings>  
</system.serviceModel>

Unfortunately this did not solve the problem for me, I spent quite some time to resolve the issue. Turns out I also had to modify the IIS settings of the website that was hosting the WCF service. The config setting is called ‘uploadReadAheadSize’ and can be found in the serverRuntime section below system.webServer and you can use the configuration editor feature of IIS manager to modify it. Give it the same or a larger value you specify in your WCF configuration.

Model binding with Headers in ASP.NET WebAPI

While writing the previous blog post I noticed that Outlook sends an additional header “IfModifiedSince” when updating its subscription of the iCal feed. It would be nice to support this additional parameter in the API to retrieve appointments. Instead of always returning the entire list of appointments, an additional filter will be used to limit the appointments to those that were changed since our last synchronization.

ifModifiedSinceWhile we could just read the header value inside of our controller action, it would be much nicer if our action would receive it as a parameter. The extension points we need in this case fall under the model binding category and while it shares the same idea and goals with ASP.NET MVC, there are some differences between ASP.NET MVC and WebAPI. There is a great MSDN article which covers most of the things we need.

The two concepts we need to grasp are model binders and value providers. Value providers are an abstraction over, well, values. For instance there’s a query string value provider that reads the query string and will allow those values to be used as parameters in your actions or by model binders. Model binders actually do something with values, they will use value providers to retrieve i.e. a first name and last name value and create a more complex instance.

So in this case we need to read a value from a header inside our HttpRequestMessage. Let’s implement a value provider for our IfModifiedSince header by implementing the IValueProvider interface.

public class IfModifiedValuesProvider
    : IValueProvider
{
    private HttpRequestMessage _request;
    private const string header = "IfModifiedSince";
 
    public IfModifiedValuesProvider(HttpRequestMessage requestMessage)
    {
        _request = requestMessage;
    }
 
    public bool ContainsPrefix(string prefix)
    {
        bool found = false;
        if (string.Equals(header, prefix, StringComparison.OrdinalIgnoreCase))
        {
            found = _request.Headers.Any(x => x.Key == prefix);    
        }
        return found;            
    }
 
    public ValueProviderResult GetValue(string key)
    {
        var headerValue = _request.Headers.IfModifiedSince;
        ValueProviderResult result = null;
        if (headerValue.HasValue)
        {
            result = new ValueProviderResult(headerValue, headerValue.ToString(), CultureInfo.InvariantCulture);
        }
        return result;
    }
}

The two methods we need to implement are ContainsPrefix and GetValue. The ContainsPrefix is of no importance in this case, GetValue is where the magic happens. In this method we read the the value from the header and, if it exists, return a ValueProviderResult populated with the current values. ValueProviders are always accompanied by ValueProviderFactories. It’s the responsibility of the factory to create and setup the value provider. In this case we want to supply our value provider with a reference to the current HttpRequestMessage.

public class IfModifiedValuesProviderFactory 
    : ValueProviderFactory
{
    public override IValueProvider GetValueProvider(HttpActionContext actionContext)
    {
        return new IfModifiedValuesProvider(actionContext.Request);
    }
}

Inheriting from the abstract base ValueProviderFactory allows us to override the GetValueProvider method where we initialize our value provider. We now have enough infrastructure to go back to our AppointmentController.

public IEnumerable<AppointmentModel> Get([ValueProvider(typeof(IfModifiedValuesProviderFactory))]DateTimeOffset? ifModifiedSince = null)
{
    IEnumerable<AppointmentModel> models = null;
    using (var context = new AppointmentsEntities())
    {               
        IQueryable appointments = context.Appointments;
        if (ifModifiedSince.HasValue) 
        {
            appointments = appointments.Where(x => x.LastModifiedDate >= ifModifiedSince.Value);
        }
        models = MapAppointents(appointments);
    }
    return models;
}

By decorating the ifModifiedSince parameter with the ValueProvider attribute it will be populated with the result of the GetValue call. Which does resolve our issue, but it would be even better if users of our API would be able to pass the ifModifiedSince date by using the header or supply it via a parameter in the query string. There are several ways to make this happen.

One approach would be to use the ValueProvider attribute again, chaining along every value provider we want to use.

public IEnumerable<AppointmentModel> Get(
    [ValueProvider(typeof(IfModifiedValuesProviderFactory), typeof(QueryStringValueProviderFactory ))]
    DateTimeOffset? ifModifiedSince = null)
{
    // omitted
}

Adding the QueryStringValueProviderFactory to the list of value providers will help us, but every time we want to add another source of our ifModifiedSince parameter we will have to add it here.

A better approach is to remove the attribute on the parameter entirely and add our value provider to the configuration of our WebAPI.

public static void Register(HttpConfiguration config)
{
    config.Services.Add(typeof(ValueProviderFactory), new IfModifiedValuesProviderFactory());
}

If we now run the application and use a query string to supply the value for our action, we will see that the date is passed along to our controller. Unfortunately if a client application uses the header, our custom value provider is not invoked at all. What’s missing?

Well it turns out that when you declare actions on your controller, by default only data that’s present in the route data dictionary or the query string will be passed to the controller. It’s like putting [FromUri] on your parameters. If we want have our own value provider come into play we have to use the [ModelBinder] attribute as well.

public IEnumerable<AppointmentModel> Get([ModelBinder]DateTimeOffset? ifModifiedSince = null)
{
   // omitted
}

Now we’re telling WebAPI to use the model binding infrastructure. The default model binder will use all the registered value providers to create a match. Since we’ve registered our IfModifiedValuesProviderFactory in the WebAPI configuration, it will be automatically picked up. If a user of our API uses a query string to pass along the ifModifiedSince value, that will keep working as well. If we add a CookieValueProvider in the future, we will only have to implement the value provider and add it to the configuration of our application. We will not have to inspect every method to see where we should add them explicitly. Best of both worlds. There’s a nice poster of the lifecycle of an HttpRequestMessage on MSDN which includes an illustration on how model binding works.

Exposing iCal data in WebAPI

With ASP.NET Web API it’s now easier than ever to create lightweight HTTP services in .NET. Out of the box the ApiControllers you implement can read json, xml and form encoded values from the HTTP request but also write xml and json to the HTTP response.

HTTP has the concept of content negotiation. This means that when a client requests a resource, it can tell the server that it wants the result in a specific format.

Below you can see an HTTP request that requests json:

And in the HTTP response the data is formatted accordingly:

If the client requests the response to be formatted as xml:

Then the result will be returned as xml:

This mechanism can be extended to support different kind of formatters to read from or write to the body of a request or response.

Let’s say we want to support an additional format that can write appointments in iCal format. To create a custom formatter you inherit from BufferedMediaTypeFormatter or MediaTypeFormatter. For this example I chose the first one.

The code is pretty straightforward and represents a very simple implementation of the iCal standard. The only WebAPI specific code can be found in the constructor.There we add the mapping for the headers we want the formatter to be invoked for. After we add the formatter to the configuration object, it will be invoked automatically whenever a client says it accepts “text/iCal”.

The current setup works fine in Fiddler, or when you use a custom client (JavaScript or HttpClient). But for a true end-to-end sample I want to use Outlook to connect to my appointment service.

Unfortunately Outlook does not send an accept header with text/iCal when it requests resources from an internet calendar. So we need to work around this problem.

Here another extensibility point of ASP.NET Web API comes into play: MessageHandlers.

MessageHandlers allow you to plug into the request processing pipeline on its lowest level. You can inspect the request and response message and make changes. In this case we can inspect the user agent that is added to the request when Outlook contacts our service. When we find a match, we will add an additional header to the incoming request.

We also add this message handler to the configuration object.

We now have everything in place to add an internet calendar in Outlook and view the appointments in our WebAPI.

  1. Open Outlook
  2. Go to Calendar
  3. In the ribbon, click on “Open Calendar” and then “From Internet”
  4. Fill in the url of the AppointmentService in WebAPI i.e. http://localhost:58250/api/appointments
  5. Click Ok.

You now have one AppointmentController serving json, xml and iCal! The complete source can be downloaded here.