Last week I got my hands on a Raspberry Pi and this weekend I finally found some time to sit down and get my first project with a Pi going. Naturally I ran into several issues and with today being Pi day, I thought I’d share my notes.
Last year I started a project with a bunch of colleagues where we try to monitor our gas, water and electricity meter. I’ve presented what we achieved so far at Cloudbrew last year. The aim is to build an IoT solution with a mobile application, cloud backend and lots of devices (Arduino’s and Pi’s for now). I didn’t want to wait on us finishing this to gather readouts from our utility meters so I thought I’d grab a Pi or two and get started. Since we already had figured out how to get the readouts I thought an hour or two would be all I need to put the solution on a Pi.
First thing I did was to download Raspbian Jessie Lite and follow the steps from the official site. Jessie is a headless operating system, since I won’t be connecting a monitor. I’m not choosing Windows 10 IoT for now because the onboard Wifi, a main selling point of the new Pi, is not supported at the time of this writing.
After connecting an ethernet cable and a power supply I used PuTTY to open an SSH session to connect to the Pi. So far so good.
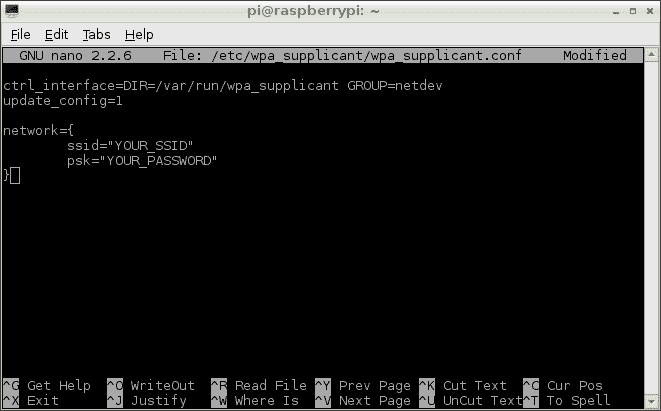
The next task was to get the Wifi going. This turned out to be rather easy. Open “/etc/wpa_supplicant/wpa_supplicant.conf” in your editor and add the SSID and password of the network you want to connect to. Like most of the time, someone else had written down the instructions.
sudo nano /etc/wpa_supplicant/wpa_supplicant.conf |
sudo nano /etc/wpa_supplicant/wpa_supplicant.conf
I unplugged the ethernet cable and connected via Wifi. I then updated the Pi with “sudo apt-get update” and “sudo apt-get upgrade” so I was running the latest bits.
sudo apt-get update
sudo apt-get upgrade |
sudo apt-get update
sudo apt-get upgrade
Next up, programming. I briefly looked at the options I had. I could program in C, Python, C++, and many others. But time was limited this weekend. I live and breath .NET so I changed the list to .NET Core or Mono. I chose Mono because I had experimented with it years ago and .NET Core has not yet reached a stable point. Toying around with alpha and beta releases was not on my todo list for today.
The default package repository has a very old version of Mono, so you need to follow the instructions on the Mono site. Add the signing key and package repository to your system then run “sudo apt-get install mono-runtime”.
sudo apt-key adv --keyserver hkp://keyserver.ubuntu.com:80 --recv-keys 3FA7E0328081BFF6A14DA29AA6A19B38D3D831EF
echo "deb http://download.mono-project.com/repo/debian wheezy main" | sudo tee /etc/apt/sources.list.d/mono-xamarin.list
sudo apt-get update |
sudo apt-key adv --keyserver hkp://keyserver.ubuntu.com:80 --recv-keys 3FA7E0328081BFF6A14DA29AA6A19B38D3D831EF
echo "deb http://download.mono-project.com/repo/debian wheezy main" | sudo tee /etc/apt/sources.list.d/mono-xamarin.list
sudo apt-get update
sudo apt-get install mono-runtime |
sudo apt-get install mono-runtime
I created a Hello World console application on my Windows 10 laptop and used PSFTP to copy the exe to the Pi. It just worked.

Then the search was on to find a library to interface with the GPIO pins on the Pi. After looking around I found Raspberry Sharp IO . It had the API I wanted. You can use the event model to track changes in the GPIO pins, just what I needed.
var pin2Sensor = ConnectorPin.P1Pin11.Input();

GpioConnection connection = new GpioConnection(pin2Sensor);
connection.PinStatusChanged += (sender, statusArgs)
=> Console.WriteLine("Pin changed", statusArgs.Configuration.Name); |
var pin2Sensor = ConnectorPin.P1Pin11.Input();
GpioConnection connection = new GpioConnection(pin2Sensor);
connection.PinStatusChanged += (sender, statusArgs)
=> Console.WriteLine("Pin changed", statusArgs.Configuration.Name);
Deploying this to the Pi however resulted in catastrophic failure. Some weird error message:
pi@raspberrypi:~/ticktack $ sudo mono TickTackConsole.exe
Missing method .ctor in assembly /home/pi/ticktack/Raspberry.IO.GeneralPurpose.dll, type System.Runtime.CompilerServices.ExtensionAttribute
Can't find custom attr constructor image: /home/pi/ticktack/Raspberry.IO.GeneralPurpose.dll mtoken: 0x0a000014
* Assertion at class.c:5597, condition `!mono_loader_get_last_error ()' not met

Stacktrace:


Native stacktrace:


Debug info from gdb:

[New LWP 1965]
[Thread debugging using libthread_db enabled]
Using host libthread_db library "/lib/arm-linux-gnueabihf/libthread_db.so.1".
0x76e67ee8 in __libc_waitpid (Cannot access memory at address 0x1
pid=1966, stat_loc=0x7e904960, options=0) at ../sysdeps/unix/sysv/linux/waitpid.c:40
40      ../sysdeps/unix/sysv/linux/waitpid.c: No such file or directory.
  Id   Target Id         Frame
  2    Thread 0x769f3430 (LWP 1965) "mono" 0x76e65a40 in do_futex_wait (isem=isem@entry=0x3181a4) at ../nptl/sysdeps/unix/sysv/linux/sem_wait.c:48
* 1    Thread 0x76f5e000 (LWP 1961) "mono" 0x76e67ee8 in __libc_waitpid (Cannot access memory at address 0x1
pid=1966, stat_loc=0x7e904960, options=0) at ../sysdeps/unix/sysv/linux/waitpid.c:40

Thread 2 (Thread 0x769f3430 (LWP 1965)):
#0  0x76e65a40 in do_futex_wait (isem=isem@entry=0x3181a4) at ../nptl/sysdeps/unix/sysv/linux/sem_wait.c:48
#1  0x76e65af4 in __new_sem_wait (sem=0x3181a4) at ../nptl/sysdeps/unix/sysv/linux/sem_wait.c:69
#2  0x00219f98 in mono_sem_wait ()
#3  0x0019091c in ?? ()
Backtrace stopped: previous frame identical to this frame (corrupt stack?)

Thread 1 (Thread 0x76f5e000 (LWP 1961)):
Cannot access memory at address 0x1
#0  0x76e67ee8 in __libc_waitpid (pid=1966, stat_loc=0x7e904960, options=0) at ../sysdeps/unix/sysv/linux/waitpid.c:40
#1  0x000c0ba4 in ?? ()
Cannot access memory at address 0x1
Backtrace stopped: previous frame identical to this frame (corrupt stack?)

=================================================================
Got a SIGABRT while executing native code. This usually indicates
a fatal error in the mono runtime or one of the native libraries
used by your application.
================================================================= |
pi@raspberrypi:~/ticktack $ sudo mono TickTackConsole.exe
Missing method .ctor in assembly /home/pi/ticktack/Raspberry.IO.GeneralPurpose.dll, type System.Runtime.CompilerServices.ExtensionAttribute
Can't find custom attr constructor image: /home/pi/ticktack/Raspberry.IO.GeneralPurpose.dll mtoken: 0x0a000014
* Assertion at class.c:5597, condition `!mono_loader_get_last_error ()' not met
Stacktrace:
Native stacktrace:
Debug info from gdb:
[New LWP 1965]
[Thread debugging using libthread_db enabled]
Using host libthread_db library "/lib/arm-linux-gnueabihf/libthread_db.so.1".
0x76e67ee8 in __libc_waitpid (Cannot access memory at address 0x1
pid=1966, stat_loc=0x7e904960, options=0) at ../sysdeps/unix/sysv/linux/waitpid.c:40
40 ../sysdeps/unix/sysv/linux/waitpid.c: No such file or directory.
Id Target Id Frame
2 Thread 0x769f3430 (LWP 1965) "mono" 0x76e65a40 in do_futex_wait (isem=isem@entry=0x3181a4) at ../nptl/sysdeps/unix/sysv/linux/sem_wait.c:48
* 1 Thread 0x76f5e000 (LWP 1961) "mono" 0x76e67ee8 in __libc_waitpid (Cannot access memory at address 0x1
pid=1966, stat_loc=0x7e904960, options=0) at ../sysdeps/unix/sysv/linux/waitpid.c:40
Thread 2 (Thread 0x769f3430 (LWP 1965)):
#0 0x76e65a40 in do_futex_wait (isem=isem@entry=0x3181a4) at ../nptl/sysdeps/unix/sysv/linux/sem_wait.c:48
#1 0x76e65af4 in __new_sem_wait (sem=0x3181a4) at ../nptl/sysdeps/unix/sysv/linux/sem_wait.c:69
#2 0x00219f98 in mono_sem_wait ()
#3 0x0019091c in ?? ()
Backtrace stopped: previous frame identical to this frame (corrupt stack?)
Thread 1 (Thread 0x76f5e000 (LWP 1961)):
Cannot access memory at address 0x1
#0 0x76e67ee8 in __libc_waitpid (pid=1966, stat_loc=0x7e904960, options=0) at ../sysdeps/unix/sysv/linux/waitpid.c:40
#1 0x000c0ba4 in ?? ()
Cannot access memory at address 0x1
Backtrace stopped: previous frame identical to this frame (corrupt stack?)
=================================================================
Got a SIGABRT while executing native code. This usually indicates
a fatal error in the mono runtime or one of the native libraries
used by your application.
=================================================================
Fast forward 4 hours. It turns out installing mono runtime doesn’t quite get you all the bits you need. You need to run the following command:
sudo apt-get install libmono-system-core4.0-cil |
sudo apt-get install libmono-system-core4.0-cil
After that the application started again. The button I had connected to the pins activated my code. Yay! With that my time for the weekend was all used up but I’m now ready to be create my actual application.

To be continued. #MarchIsForMakers


