Azure Day Poland – Multi tenant apps with Azure and Azure DevOps

I was honoured to speak at Azure Day in Poland on 29th March 2019. It was the perfect spot for my talk featuring football tenants.

There was quite a crowd for the talk and some people approached me after the talk for some more info. It was also fun to explore the city.

Recordings of the talk are available from Moscow and Vilnius.

DevOps Pro – Multi tenant apps with Azure and Azure DevOps

The latest two talks I gave were at the DevOps Pro conferences in Moscow and Vilnius. Unlike most of my talks, shocking, this one was based on stuff that’s actually running in production and not just me trying out something new and sharing my experiences.

I’m never happy with how it went but perhaps that’s just me. The questions and feedback I get is almost always positive but I’m not sure if that’s just people being friendly or real feedback. Imposter syndrome anyone? Anyway, enough about the talks. Show me some content! The slides can be found here, although I don’t think they will help you much, most content is in the code and it turns out I can hardly show anything of it during a 45 minute talk.

The talk is divided in three parts:

  • Secure
    • Azure AD with Users, App Registrations, Application Roles etc.
    • KeyVault
    • Managed Identity
  • Isolation
    • Showing some approaches on how to architect solutions
  • Automation
    • Demo 1 is focused on a single app where tenants have their own data store but share the app service. I use Azure automation to update the application manifest in AD and deploy ARM templates
    • Demo 2 is the cool guy in town but never receives enough attention. I use the REST api of Azure DevOps to update a release definition, add a stage, configure some variables and deploy an entire new resource group.

I will create a few additional blogposts to illustrate how it works. Next week I’ll be at AzureDay so I can try it again.

CloudBrew: The blockchain and you

Last Saturday I presented at CloudBrew. In 2015 my talk focused on doing IoT in your own home. This year it was time for something completely different.

The past months I’ve been looking at blockchain technology and together with my colleague Hans we introduced the audience in this new world. Since it was a technical conference we explained how the basic principles are implemented and gave a demo of our own little distributed application.

You can get the slides here and the demo code is located in my GitHub account. Over the past months I plan to write down what I’ve learned so far and will also improve the sample application.

Tracking water usage with Rasbian, Mono and Azure

Although I had this up and running back in March, it took me a while to find some time to write everything down. Here it goes.

Part 1: how does stuff work?

With my .NET application running on the Pi. I now had to see how I could monitor my water usage. Typical water meters in Belgium, or at least where I live, look quite dull but they have everything what’s needed to make them smart.

One way to get automatic readouts is to contact the supplier and let them add a logger but it’s not cheap. Their website is not really helpful but it looks like it will cost more than €100 and then there is a yearly or monthly fee. Not a valid option.

However if you do some research you’ll find info on how these meters work and chances are your meter is outputting a magnetic pulse. In the video below you will see a very nice explanation of it at around 0:35.

With my newfound knowledge I installed the application “Magnetic Detector!” on my iPhone and headed down in the basement while the tap was running and sure enough a sine wave appeared.

sine wave

While doing further research I learned that detecting magnetism can be done with a reed switch or a Hall effect sensor. I chose the first one since the Hall effect sensor would need power all the time and eventually I want to replace the Pi with a tiny board. Basically the reed switch is just like a manually operated switch except it will close whenever a magnet is nearby.

Part 2: Wiring it up

I bought a reed switch for €3 and set everything up. I first tested with a regular magnet to see if everything worked and then placed my setup near my water meter.

schema

The reed switch can be inserted into a cavity of the water meter, apparently it’s really built to accept these kinds of devices.

meter

Part 3: Storing the readouts

With the hard part behind me, I created a free Azure web app and connected it to a free SQL database. Note that you can only create a free SQL database from within an Azure web app, if you go directly to SQL databases you will not find that option.

free database

Since it’s a .NET app I also installed the package Newtonsoft.Json to transfer my pulse counts to the Azure web app. I spent several hours trying to get it working though as I, once again, was faced with a mysterious error.

System.TypeInitializationException: The type initializer for 'Newtonsoft.Json.JsonWriter' threw an exception. ---> System.BadImageFormatException: Could not resolve field token 0x04000493
File name: 'Newtonsoft.Json'
  at Newtonsoft.Json.JsonWriter.BuildStateArray () <0x76860c90 + 0x0009f> in <filename unknown>:0

Don’t know why, but I eventually went looking at the dependencies of Newtonsoft.Json and then explicitly updated my mono installation with the necessary bits from the Debian package list. Everything started working and uploading the pulse was just plain C#.

public void Upload(Tick tick)
{
    using (HttpClient client = new HttpClient())
    {
        client.PostAsync(_apiEndpoint, new StringContent(JsonConvert.SerializeObject(tick), Encoding.UTF8, "application/json")).Wait();
    }
}

My database started filling up and after only one day I could calculate that my showers were consuming 70 liters and the dishwasher 30 liters. Time to cut back on the time spent in the shower!

ticksdb

In order to keep the program running in the background I’m using a program called screen, you can find more info on that in this excellent post.

Part 4: Next steps
I had the Pi running in April, but had some issues with the Wifi. Some days I received no pulses at all and I had to reboot to gain access. Since then, well actually yesterday, I’ve changed to code to keep track of the pulse counts that failed to be uploaded and transfer them at a later time. Next up will be to create a dashboard to view the pulses or add further sensors to monitor gas and electricity.

Scaling an Azure Event Hub: Throughput units

When navigating to the scale tab of an event hub there are only two options you can choose: messaging tier and eventhub throughput units.

Scale settings

The messaging tier enables features and sets the amount you pay for messages or connections. You can find more info on the Azure website.

A throughput unit (TU) has quite a direct impact on the performance. A TU currently has these limits: 1 MB/s Ingress, 2 MB/s egress, and up to 84 GB of event storage. The default value is 1 TU.

In the picture below you can see that I had one cloud service pushing messages to an event hub until 10:00. I then scaled out the service to 20 instances. This resulted in about twice the amount of messages being sent (from 200k to 400k), not really what you expect. I was also getting more errors, from time to time the event hub was sending back server busy messages.

TP

At about 10:30 I increased the TU from 1 to 3, this not only stopped the errors from occurring but further increased the throughput from 400k to over 1 million messages being received on the event hub per 5 minutes.

Partitioning and wildcards in an Azure Data Factory pipeline

In a previous post I created an Azure Data Factory pipeline to copy files from an on-premise system to blob storage. This was a simple copy from one folder to another one.

It’s possible to add a time aspect to this pipeline. Let’s say I want to keep an archive of these files. In my source folder files get added, modified and deleted. I’d like to create daily snapshots of this folder.

To enable this scenario you only need to change the dataset that represents the file location in blob storage.

{
    "name": "AzureBlobDatasetTemplate",
    "properties": {
        "location": {
            "type": "AzureBlobLocation",
            "folderPath": "myblobcontainer/{Year}/{Month}/{Day}",
            "partitionedBy": [
                {
                    "name": "Year",
                    "value": {
                        "type": "DateTime",
                        "date": "SliceStart",
                        "format": "yyyy"
                    }
                },
                {
                    "name": "Month",
                    "value": {
                        "type": "DateTime",
                        "date": "SliceStart",
                        "format": "MM"
                    }
                },
                {
                    "name": "Day",
                    "value": {
                        "type": "DateTime",
                        "date": "SliceStart",
                        "format": "dd"
                    }
                }
            ],
            "linkedServiceName": "StorageLinkedService"
        },
        "availability": {
            "frequency": "Day",
            "interval": 1
        }
    }
}

I’ve changed the folderPath and added a partitionedBy element. The folderPath now contains placeholders, the elements between curly braces. The definition of these placeholders is defined in the partitionedBy array. Each element will use the variable SliceStart to create a value. The only other variable you can use, at this time, is SliceEnd. If you make this change to the dataset the next run of the pipeline will produce the desired output.

partitionedfiles


I also tested what happens when a file is in use, an exception. So make sure the application that creates the files you want to copy releases any locks.

inuse


Wildcards can be used in the filename and the filter, so you can copy all txt files in a folder with *.txt. Unfortunately wildcards and partition placeholders can not be combined. So if your files are all being stored in one folder, but each file has the time in its filename (myFile-2015-07-01.txt), you can’t create a filter with the dynamic partitions (myFile-{Year}-{Month}-{Day}txt). It’s only possible to use the partitionedBy section in the folder structure as shown above. If you think this is a nice feature, go vote here!

The price of the current setup is determined by a couple of things. First we have a low frequency activity, that’s an activity that runs daily or less. The first 5 are free, so we have 25 activities remaining. The pricing of an activity is determined on the place where it occurs, on-premise or in the cloud. I’m assuming here it’s an on-premise activity since the files are not located in Azure. I’ve asked around if this assumption is correct but don’t have a response yet. The pricing of an on-premise activity is €0.5586 per activity. So that would mean almost €14 for this daily snapshot each month. If we modified everything to run hourly we’d have to pay €554,80 per month. You can find more info on the pricing on their website.

In this scenario I’ve demonstrated how to get started with Azure Data Factory. The real power however lies in the transformation steps which you can add. Instead of doing a simple copy the data can be read, combined and stored in many different forms. A topic for a future post.

Upside:

  • Rich editor
  • Fairly easy to get started
  • No custom application to write
  • On-premise support via the Data Management Gateway
  • No firewall settings need to be changed

Downside

  • Can get quite expensive

Copying files with Azure Data Factory

The goal of Azure Data Factory is to create a pipeline which gathers a lot of data sources and produces a reliable source of information which can be used by other applications. The pain of interfacing with every differnt type of datastore is abstracted away from every consuming application. You can have relational databases, flat files, whatever and create a pipeline which transforms and enriches the data.  In an update published the end of March it was announced that you can also copy files. I wanted to try this out and it proved to be a bit more cumbersome than I first imagined. Let’s take a look.

filecopyflowI want to create a very basic flow. Let’s say I have an application which is populating files in a folder and I now want to move the file into Azure blob storage. I can use the same use case as mentioned in my previous post, I’m placing data leaks in a folder and need them to be sent online for further processing.

After creating a data factory in your Azure account we’ll need the following components:

  • Two linked services
    • A connection to my on-premises folder
    • A connection to my blob storage account
  • Two datasets (also called tables)
    • A dataset containing info on where my data is stored on premise and how many times per day it can be fetched.
    • A dataset which has info on how and where to store the data in blob storage
  • One pipeline which contains an activity which connects the datasets.

The connection to the on premise file is handled by an application which you need to install on-premise.  By navigating to the linked services slice you can add a data gateway.

datagateway

To configure a gateway you only need to provide a name, you can then download the data gateway application and install it on premise. After installing the application you need to enter the key which can be viewed in the Azure portal.

newdatagateway

As far as the on-premise configuration, you are done. You do not need to configure any firewall ports but you can only install it once on a PC.

So far the wizards. Now we need to create the pipeline. After clicking on the “Author and deploy” tile. The browser navigates to an online editor.

authoranddeploy

You create linked services, datasets and pipelines by using JSON. When clicking on any of the menu options, you can select a template to get started.

editornew


As mentioned earlier I needed two linked services. You can create those via the new data store option. The first one I’ll create is the on-premise file data store.

{
    "name": "OnPremisesFileSystemLinkedService",
    "properties": {
        "host": "localhost",
        "gatewayName": "mydatagateway",
        "userId": "BennyM",
        "password": "**********",
        "type": "OnPremisesFileSystemLinkedService"
    }
}

The options you need to configure are:

  • host, which will be the name of the machine which contains the files/folder you need to connect to
  • gatewayName, which has to match the name of the gateway which we created earlier
  • a userid and password or encryptedcredentials to use to connect from the gateway to the target machine
  • type, which needs to be OnPremisesFileSystemLinkedService
  • name, which we will use later

The next one will be the connection to the Azure storage. You can get the template by clicking “New data store” and selecting “Azure storage”.

{
    "name": "StorageLinkedService",
    "properties": {
        "connectionString": "DefaultEndpointsProtocol=https;AccountName=bennymdatafactory;AccountKey=**********",
        "type": "AzureStorageLinkedService"
    }
}

The options you need to configure are:

  • name, which we will use later
  • connectionstring, which needs to match your connectionstring for Azure storage
  • type, which needs to be AzureStorageLinkedService

Next one, the first dataset: on-premises file.

{
    "name": "OnPremisesFile",
    "properties": {
        "location": {
            "type": "OnPremisesFileSystemLocation",
            "folderPath": "c:\\Temp",
            "linkedServiceName": "OnPremisesFileSystemLinkedService"
        },
        "availability": {
            "frequency": "Day",
            "interval": 1,
            "waitOnExternal": {
                "dataDelay": "00:10:00",
                "retryInterval": "00:01:00",
                "retryTimeout": "00:10:00",
                "maximumRetry": 3
            }
        }
    }
}

The options you need to configure:

  • again a name, which we’ll use later
  • type, which has to be OnPremisesFileSystemLocation
  • folderpath, where is the folder I want to sync. Note the double slashes.
  • linkedServiceName, this has to be the same value which we used earlier when we created the data store for the on-premises gateway.
  • availability, how many times will the on-premises file or folder by synchronized. What’s very important is the waitOnExternal. You have to configure this if the data is not produced by the data factory itself. In this case it’s an external source so I have to fill in some values.

Our next dataset is the Azure blob.

{
    "name": "AzureBlobDatasetTemplate",
    "properties": {
        "location": {
            "type": "AzureBlobLocation",
            "folderPath": "myblobcontainer",
            "linkedServiceName": "StorageLinkedService"
        },
        "availability": {
            "frequency": "Day",
            "interval": 1
        }
    }
}

Fairly easy to configure.

  • again a name
  • the type which has to be AzureBlobLocation
  • the folderPath wich will be the path inside my Azure blob storage account which was configured in the linked service
  • linkedServiceName, which has to match the name we used earlier.

Then the actual workflow, the pipeline.

{
    "name": "CopyFileToBlobPipeline",
    "properties": {
        "activities": [
            {
                "type": "CopyActivity",
                "transformation": {
                    "source": {
                        "type": "FileSystemSource"
                    },
                    "sink": {
                        "type": "BlobSink",
                        "writeBatchSize": 0,
                        "writeBatchTimeout": "00:00:00"
                    }
                },
                "inputs": [
                    {
                        "name": "OnPremisesFile"
                    }
                ],
                "outputs": [
                    {
                        "name": "AzureBlobDatasetTemplate"
                    }
                ],
                "policy": {
                    "timeout": "00:05:00",
                    "concurrency": 4
                },
                "name": "Ingress"
            }
        ],
        "start": "2015-06-28T00:00:00Z",
        "end": "2015-06-30T00:00:00Z"
    }
}

I will not go over every property. What’s important is that in the copy activity we tie our two datasets together. The start and end times indicate the time period our pipeline will be active. This is very important as I’ve not found any way you can pause a running pipeline. If for instance I indicated earlier that I want my folder to be copied every 15 minutes and indicate a start date in the pipline in the year 2010, the pipeline will do all historical runs! So be careful when you configure this as Azure Data Factory isn’t the cheapest service around.

Every time you create a linked service, dataset or pipeline you click deploy.  The editor will then validate if all the names you mention are actually correct. The editor is quite good, as it even detects errors in datatypes and gives you help and intellisense (control + space).

editorerror

editorhelp

And with all this deployed, the folder is being synchronized online.

copyresult

This is probably one of the most expensive file copy samples. In a next post I’ll investigate more features. One of the drawbacks of the current setup is that every time the sync runs all files are overwritten. All files are copied all the time as is.

Sources:


Using HDInsight & Storm to process 100 million events

bqezxjIn my last post I threw 100 randomly generated email addresses to an Azure event hub and it didn’t even budge. Now it’s time to process the data and store it in a setup that resembles haveibeenpwned.

With the events now in the event hub, I could create another cloud service which uses the .NET SDK to read the data. There are two ways to implement this, either with the EventHubReceiver class or with the EventProcessorHost. I’ll try these out in future post.

For now I wanted to use something else, HDInsight & Storm. HDInsight is Hadoop as PaaS. Storm is a computation system to process streams of data and, as advertised on their website, should be able to process millions of tuples per second. Sounds like a good way to handle the 100 million e-mail addresses I have waiting.

In order to use Storm you need to understand only a few concepts:

  • Tuple: a piece of information that needs to be processed.
  • Spout: reads from a stream and returns tuples
  • Bolt: processes tuples and can forward or produce new tuples
  • Topology: links spouts and bolts together

This is a very rudimentary explanation, but should be enough for this post.

In order to write and publish a topology in Visual Studio, you should have the Azure SDK and the HDInsight tools for Visual Studio. Let’s look at the different components we need.

The spout will be reading from our event hub. Microsoft has already written a spout which you can use. However it is written in Java. Storm is not bound to one language, a core feature and with HDInsight you can have hybrid topologies. Any work you have already invested in Storm can be reused. Java and C# spouts and bolts can even work together. Let’s look at the configuration that we need to get our spout up and running.

TopologyBuilder topologyBuilder = new TopologyBuilder("EmailProcessingTopology");           
 
int partitionCount = Properties.Settings.Default.EventHubPartitionCount;
 
JavaComponentConstructor constructor = JavaComponentConstructor.CreateFromClojureExpr(
    String.Format(@"(com.microsoft.eventhubs.spout.EventHubSpout. (com.microsoft.eventhubs.spout.EventHubSpoutConfig. " +
        @"""{0}"" ""{1}"" ""{2}"" ""{3}"" {4} ""{5}""))",
        Properties.Settings.Default.EventHubPolicyName,
        Properties.Settings.Default.EventHubPolicyKey,
        Properties.Settings.Default.EventHubNamespace,
        Properties.Settings.Default.EventHubName,
        partitionCount,
        "")); 
 
topologyBuilder.SetJavaSpout(
    "EventHubSpout",  
    constructor,      
    partitionCount);

This code can be found in the samples of the HDInsight team and is pretty straightforward. Create an eventhubspout and add it to the topology. The partitionCount indicates how many executors and tasks there should be and it’s suggested that this should match the amount of partitions of your event hub.

It gets more interesting in the first bolt. A bolt is a class that implements ISCPBolt. This interface has one method, Execute, which receives a tuple.

public void Execute(SCPTuple tuple)
{  
    string emailAddress = (string)tuple.GetValue(0);
 
    if (!string.IsNullOrWhiteSpace(emailAddress))
    {             
        JObject eventData = JObject.Parse(emailAddress);
        try
        {
            var address = new System.Net.Mail.MailAddress((string)eventData["address"]);
            var leakedIn = (string)eventData["leak"];
            var breachedAccount = new BreachedAccount(address, leakedIn);
            var retrieveOperation = TableOperation.Retrieve(breachedAccount.PartitionKey, breachedAccount.RowKey);
            var retrievedResult = table.Execute(retrieveOperation);
            var existingAccount = (Device)retrievedResult.Result;
            if(existingAccount == null)
            {
                TableOperation insertOperation = TableOperation.Insert(new BreachedAccount(address, leakedIn));
                table.Execute(insertOperation);
                ctx.Emit(Constants.DEFAULT_STREAM_ID,new[]{tuple}, new Values { address.Address });
            }
            else
            {
                existingAccount.BreachedIn += breachedAccount.BreachedIn;
                TableOperation insertOperation = TableOperation.Replace(existingAccount);
                table.Execute(insertOperation);
            }                    
            this.ctx.Ack(tuple);
        }
        catch (Exception ex)
        {
            Context.Logger.Error(eventData.ToString());
            Context.Logger.Error(ex.Message);
            this.ctx.Fail(tuple);
        }
    }
    else
    {
        Context.Logger.Info("empty address");
        this.ctx.Ack(tuple);
    }
}

The tuple is the JSON object which was send to the Azure event hub in my previous post. It contains the email address and the website which was breached. Table storage is queried to see if the email address is already present, if this is the case the entry is updated otherwise the new account is added to the system. Only new accounts are emitted for further processing.

The second bolt in the system will insert new accounts into a SQL database. Its execute method is quite different.

public void Execute(SCPTuple tuple)
{           
    // Check if the tuple is of type Tick Tuple
    if (IsTickTuple(tuple))
    {               
        if((DateTime.UtcNow - lastRun) >= TimeSpan.FromSeconds(batchIntervalInSec))
        {
            Context.Logger.Info("Time to purge!");
            FinishBatch();
        }                                
    }
    else
    {                
        breachedAccounts.Add(tuple);                
        if (breachedAccounts.Count >= batchSize)
        {
            Context.Logger.Info("Max reached, time to purge!");
            FinishBatch();
        }
        else
        {
            Context.Logger.Info("Not yet time to purge!");
        }
    }
}

This bolt does not process every tuple it receives immediately. Instead it keeps a list of tuples ready for processing when either a maximum count is reached or a specific amount of time has passed since the last purge. In the FinishBatch method a SqlBulk copy is performed to insert records in a SQL database.

private void FinishBatch()
{
    lastRun = DateTime.UtcNow;
    DataTable table = new DataTable();
    table.Columns.Add("Email");
    if (breachedAccounts.Any())
    {
        foreach (var emailAddress in breachedAccounts)
        {
            var row = table.NewRow();
            row["Email"] = emailAddress.GetString(0);
            table.Rows.Add(row);
        }
        try
        {
            using (SqlBulkCopy bulkCopy = new SqlBulkCopy(connection))
            {
                bulkCopy.DestinationTableName = "Emails";
                bulkCopy.ColumnMappings.Add("Email", "Email");
                bulkCopy.WriteToServer(table);
            }
            foreach (var emailAddress in breachedAccounts)
            {
                ctx.Ack(emailAddress);
            }
 
        }
        catch (Exception ex)
        {
            foreach (var emailAddress in breachedAccounts)
            {
                ctx.Fail(emailAddress);
            }
            Context.Logger.Error(ex.Message);
        }
        finally
        {
            breachedAccounts.Clear();
        }
    }
}

Both the table storage bolt and the SQL bulk copy bolt have lines with ctx.Ack, Fail or Emit. These are places where you can indicate whether processing of a tuple has succeeded, failed or you are emitting a new tuple to be processed further downstream. It also enables to replay tuples. If the SQL bulk copy fails the tuple will be processed again at a later time. The azure table spout expects your bolts to ack.

topologyBuilder.SetBolt(
    "TableStorageBolt",                                            
    TableStorageBolt.Get,
    new Dictionary<string, List>{
        {Constants.DEFAULT_STREAM_ID, new List(){"address"}}
    },
    256,                                      
    true)
.DeclareCustomizedJavaSerializer(javaSerializerInfo)
.shuffleGrouping("EventHubSpout");
 
topologyBuilder.SetBolt(
    "SQLBolt",                                              
    SQLStorageBolt.Get,
     new Dictionary<string, List>(),
    2,                                     
    true)
.shuffleGrouping("TableStorageBolt", Constants.DEFAULT_STREAM_ID)
.addConfigurations(new Dictionary<string,string>{{"topology.tick.tuple.freq.secs","1"}});
 
topologyBuilder.SetTopologyConfig(new Dictionary<string, string> { 
    {"topology.workers", partitionCount.ToString()}
});

The two bolts also need to be added to the topology. The tableStorageBolt is configured with a name, a method which can be used to create instances and a description of its output. In this case I’m emitting the email address to the default stream. The parallelism hint is also configured and the boolean flag which indicates this bolt supports acking. Since this bolt sits behind the Java spout, we also need to configure how the data of the spout can be deserialized. The bolt is also configured to use shuffleGrouping, meaning that the load will be spread evenly among all instances.

The SQLBolt is configured accordingly, with the additional configuration to support time ticks.

After I created an HDInsight Storm cluster on Azure I was able to publish the topology from within Visual Studio. The cluster itself was created in 15 minutes.

Capturepublish

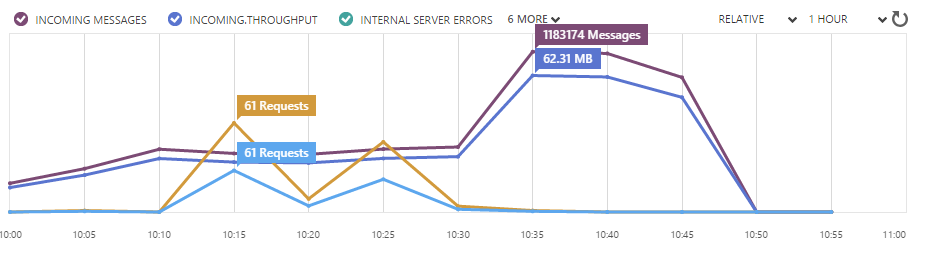
It took quite some time to find the right parallelism for this topology but with the code I’ve posted I got these results after one hour:

Capturebolts

Table storage is slow, the 2 SQL bolts are able to keep up with the 256 table storage bolts. After one hour my topology was able to process only 10 million records. Even though I was able to send all 100 million events to the event hub in under two hours, processing would take 5 times longer.

One of the causes for this is the test data. The partition and row key for the table storage is based on the email address.

class BreachedAccount : TableEntity
{
    public BreachedAccount() { }
 
    public BreachedAccount(System.Net.Mail.MailAddress emailAddress, string leakedIn)
    {         
        this.PartitionKey = emailAddress.Host;         
        this.RowKey = emailAddress.Address;            
    }
 
    public string BreachedIn { get; set; }
}

Yet none of the email addresses in my test data share the same partition key. If the data was more realistic I would be able to use batches. In the original Adobe data breach 115 million addresses were part of 130 different domains. Table storage allows you to send batches of 100 records to the same partition key, which should result in less processing time. I’ll regenerate the test data with the same characteristics, modify the table storage bolt and rerun the experiment at a later time, hoping to get a better result.

The original standard instance of SQL Server was scaled to an S3, which allowed me to stay just below the max throughput with batches of 1000 records.

Capturesql

At the moment I actually have the same performance as Troy’s setup but with quite a different approach. Storm and HDInsight were new to me and I enjoyed the programming model. The scale and possibilities it can give are enormous, yet every part of your topology needs quite some attention if you want to have a high throughput solution.

The .NET part of the SDK is not yet entirely complete, so you can’t just port Java snippets to C# and expect them to work. I also ran into some NotImplementedExceptions. Microsoft is still busy implementing the SDK and the team is actively adding examples and functionality.

Further reading:

Event Hubs Programming Guide
Storm Applied
Introduction to Apache Storm on HDInsight: Real-time analytics for Hadoop
HDInsight Storm Examples
Process events from Azure Event Hubs with Storm on HDInsight
Performance Tuning for HDInsight Storm and Microsoft Azure EventHub
Understanding the Parallelism of a Storm Topology


Data leak processing

On the excellent blog of Troy Hunt you can read how he’s using Azure webjobs to process leaked user account dumps. As with anything in IT, there are many solutions to a problem. Lately I’ve been busy with Azure event hubs, streaming analytics and HDInsight, I thought it would be a nice experiment to use the same data dump but process it in an entirely different manner. In this first post, I’ll illustrate the data input part. In a follow-up post, I’ll use HDInsight to process the actual data.

The data source that has to be processed is a 5,12 GB text file containing 100 million email addresses which I uploaded to blob storage. Just like Troy I then created a batching solution to process the file in chuncks. I didn’t want to use webjobs so instead I created a cloud service. This service reads line numbers from a queue. The line numbers indicate which lines to read from the text file and send to the event hub.

DataInArchitecture

The code in the cloud service is pretty straightforward. Open a filereader and move to the line number which is indicated in the incoming message from queue storage. Then start reading the lines of the file that need to be processed and fire away at the event hub. I have not given the code much thought, so there are probably several ways this can be improved, I just wanted to get up and running. The event hub receives json objects containing the name of the website and the email address.

using (var streamReader = new StreamReader(file.OpenRead()))
{
    int row = 0;
    while (row < beginAt)
    {
        streamReader.ReadLine();
        row++;
    }
    while (row <= endAt)
    {
         row++;        
         var line = streamReader.ReadLine();        
         lines.Add(line);     
    } 
    Parallel.ForEach(lines, line => {
         var leakedEmail = JsonConvert.SerializeObject(new { leak = "websitesource", address = line });
         eventHubClient.Send(new EventData(Encoding.UTF8.GetBytes(leakedEmail)));
    });
}

I created batches of 1 million rows which means 100 batches that had to be processed. I deployed the service and then observed the system. After seeing one instance running correctly I scaled up the system to get 20 instances running simultaneous.

Capture03

The result was already quite nice. All of the instances together were sending around 4,2 million leaked email addresses every 5 minutes with a peak of 4.5 million at the end.

Capture01


This meant that in under two hours the entire file had been sent into my event hub. Capture06

Between 12 and 1 PM I only had one instance running. I scaled up somewhere between 1 and 2 PM.

What did this cost?

  • Running 20 A1 instances of a cloud service: ~ €3,5
  • Receiving 100 million event hub request (and doing some processing): ~ €2

In the next post I’ll show you the HDInsight part which will take every event from the event hub and insert or update the address in table storage.


Global Azure Bootcamp 2015 – Belgium

Last Saturday I organized, together with my employer Info Support and the Azure user group Azug, the Belgian location for the Global Azure Bootcamp. Across the entire globe 183 locations were doing the same thing, getting people together to learn and hack away on Microsoft’s cloud platform. We organised sessions and provided room so everyone could join in the labs that had been created.

The first session was presented by Johnny Hooyberghs. He gave an introduction on Visual Studio Online with a focus on getting builds set up. His session covered both the hosted build environment and creating a custom VM with your own build server. He also showed how you could add custom build steps to extend the process.

The second session was presented by Tim Mahy. He dived into Azure Search as a Service. He used his own experiences to fuel his talk, an approach I always like. He also explained everything that works underneath the public API of Azure Search which showed that it’s built on proven technology.

Session Setup

This third session was presented by myself. I’ve been experimenting with Azure Machine Learning for some time now and wanted to share what I’ve learned so far. I introduced the basic concepts of machine learning and how they relate to concepts in AzureML. I created one experiment to predict the income level of somebody, based on sample labs you can find in AzureML. For the second half of my talk I had created an online movie database (how original). I used the API of The Movie Database to get some realistic data. I then created an experiment in AzureML to get suggestions for these movies. I closed with some info on what I’ve been working on in my spare time.

The fourth session was presented by Hans Peeters and Glenn Dierckx. They had created an enormous demo around everything App service related. They started off with an API service and eventually created a Web App, a mobile app and closed by creating a logic app which combined everything they had done so far.

Last Session

The final session was presented by Reinhart De Lille. Not a deep dive in technology this time, his talk showed the other side of the coin: “How to get your company from on-premise to a cloud first world”. Quite a way to end the day, as many of the attendees probably don’t dwell on this much.

I’ve gathered the slides here.

People could also deploy compute instances to aid in breast cancer research. At the end of the day 117 billion data points were analysed and little Belgium was on the in the top 10 of contributing countries!

ScienceLab Top 10


Looking forward to next year!